
Connecting a Chromebook to a Projector
Technology can be confusing – we get it. Whether you’ve got a laptop at home, school or the office, connecting it to a projector seems like an intimidating task. But fear not! In just five easy steps, connecting your Chromebook to a projector is a snap. From setting up online presentations to making movie night a breeze, learn how to be a tech whiz in no time. So break out the popcorn, enlighten the room and learn how to connect your Chromebook to a projector. Let’s get started!
Quick Summary of Key Question
Before connecting your Chromebook to a projector, you will need an adapter that matches the port on your Chromebook. Once you have the correct adapter, you can use a VGA or HDMI cable to connect your Chromebook to the projector.
Connecting a Chromebook to a Projector is often necessary for presentations in educational, business and home settings (see the best projector for the living room). To ensure that the process is successful, it is important to know what connections can be used as well as the specific model of projector that is being used. The most common types of connections for Chromebooks are VGA, HDMI and USB-C. However, some projectors may be limited to just VGA or HDMI connections. It is important to verify which connections the projector uses before attempting to connect the device.
If the projector supports multiple connection types, there may be advantages and disadvantages to each type. For instance, VGA connections are typically less expensive and readily available in many different sizes; however, they lack sound capabilities and have been around since 1987 so they are not very high tech. Conversely, HDMI cables offer higher resolution and also provide audio capabilities but they may be more difficult to find depending on the type of projector being used. Lastly, USB-C has become increasingly popular due to its connecting speed and multi-functionality; however, this connection is still relatively new so finding compatible projectors might be challenging.
Once the connection type has been identified, it’s time to actually connect the projector with the Chromebook. To do this, first check if adapter cables are needed depending on the connection type used. If an adapter cable is required make sure that it’s compatible with both the Chromebook and Projector before beginning setup. Then insert one end of the cable into either the Chromebook’s HDMI port or USB-C port (or any other given connection) and then insert the other side into its corresponding video port on the projector. Afterward power up both devices making sure that both devices have sufficient power prior to using them together. When finished connecting both components you should now be able to view your desktop image from your Chromebook on your projector’s display screen
Now that you’ve established how to connect a Chromebook to a Projector its important learn about different types of connection types that can be utilized in order to complete this task effectively. In the following section we will discuss different connection types available when connecting a Chromebook to a Projector.
Main Points to Remember
When connecting a Chromebook to a Projector, it is important to know what connections are available on the specific projector model and any adapter cables that may be required. Common connection types for Chromebooks are VGA, HDMI, and USB-C and each offer different advantages and disadvantages. After connecting the two devices using the chosen connection type, the projector display should be visible on the laptop screen.
Different Connection Types
When connecting your Chromebook to a projector, it is important to understand the different connection types available. The two primary connection types are HDMI and VGA cables. HDMI provides digital audio and video signals with superior sound and picture quality, while VGA sends analog signals only.
HDMI is generally the preferred connection type, as it can carry high-definition video and audio, supports HDCP content protection protocols, carries signal up to 15 meters in length, and works with both extended and mirrored display modes. However, some projectors may only have VGA inputs, so this will still be an option. Furthermore, not all Chrome devices support HDMI connections, or they might need an adapter in order to do so.
VGA cables can provide reliable standard definition video on a projector but have limited options for image scaling beyond that. Also, older model projectors may not be compatible with newer versions of VGA cables due to higher resolutions now needed for computer monitors and laptop screens. That being said, VGA cables work well for connecting most PC laptops and older style Chromebooks.
It is important to note that all connection types require drivers and software updates to ensure proper compatibility between the device and the projector before any connection can be established. Understanding the different types of connections will go a long way towards understanding how best to connect your Chromebook accordingly for seamless use.
Now that we have gone over the different type of connection types available to you when connecting your Chromebook to a projector, we can move on to discussing video output in the next section.
Video Output
When connecting your Chromebook to a projector, video output is an essential factor that must be taken into account. The most common way of connecting the Chromebook to the projector is by using an HDMI cable. An HDMI connection will ensure the highest possible resolution when streaming images from handheld device to a larger display. While an HDMI cable is simple to use, there are other methods of achieving a successful video signal as well.
An alternative method for sending video from your Chromebook to a projector is through a VGA cable. This is generally considered less ideal since it does not support audio signal and cannot provide the same visual quality as HDMI cables. For those who need to save money, there are specialty cables called Chromecast Adapters which will convert the HDMI output from your Chromebook into a VGA signal that can be used with older projectors. The advantage of using this type of adapter is that it requires only one cable for both audio and video output, instead of two separate cables for each type of output.
The choice between HDMI and VGA boils down to budget and resolution needs. If money is not an issue, then an HDMI cable would be the best choice overall due to its versatility and high-definition output capability. On the other hand, if price and reliability are more important than image clarity, then going with a Chromecast Adapter or VGA cable might be more suitable.
No matter what option you choose, making sure your video output is properly connected will ensure you have a seamless viewing experience when connecting your Chromebook to a projector. Now that we’ve discussed video output, let’s move on to how you can get audio through your projection set-up in the next section.
- According to Google, nearly all Chromebooks can connect to a projector or external display using an HDMI cable.
- There are several different types of cables designed to display video on devices such as projectors, including VGA, DVI, and HDMI.
- In 2017, a survey conducted by Dell revealed that 80% of classrooms worldwide have at least one interactive display or projector for teaching and learning purposes.
Audio Output
When connecting a Chromebook to a projector, audio output is an important part of the setup process that should not be overlooked. Choosing the right audio output method will ensure seamless playback and sound for your presentation or video. There are a few methods available for audio output when connecting a Chromebook to a projector, each with its own unique considerations:
1. HDMI Cable – This is the most popular option for audio output when connecting a Chromebook to a projector as it simplifies the connection process and ensures that both video and audio signals can be transmitted quickly and easily. The downside is that this type of connection requires additional cables which can be more costly than other solutions.
2. USB Audio Adapter – An alternative option is to use an external USB audio adapter. This adapter connects directly to the projector’s 3.5mm audio input jack and can convert digital audio signals from the Chromebook into analog signals that projector can play back through its built-in speakers or external powered speakers plugged into its 3.5mm output jack. This solution is often more affordable than HDMI but may require extra power or drivers which don’t always come with the adapter itself.
3. Bluetooth Audio – Some projectors are equipped with built-in Bluetooth capabilities which allow you to connect wirelessly over short distances. Bluetooth is ideal for projectors in small rooms but may struggle to provide adequate sound quality in larger settings due to signal interference and limited transmission range.
Each of these options has its own unique advantages and disadvantages but all provide excellent audio output when connected properly to a projector from your Chromebook.
Now that we have discussed audio output for our Chromebook-to-projector connection, let’s move on to setting up the actual connection in the following section.
Setting up the Connection
Connecting your Chromebook to a projector can be done quickly and easily, depending on how you are connecting the two devices. The simplest method is with an HDMI cable, but if you don’t have one, you can also set up a connection by using a USB port or through a wireless network.
HDMI Cable: Using an HDMI cable is the easiest method of connecting your Chromebook to a projector. It’s also the fastest and allows you to get the most out of your presentation. All you need is an HDMI-compatible Chromebook and projector, along with an HDMI cable. To connect them together, simply plug one end of the cable into your Chromebook’s HDMI port and plug the other side into the projector. Once everything is connected, turn on both devices and then adjust the settings on your projector for optimal performance.
USB Port: Not all Chromebooks are equipped with an HDMI port, so if yours isn’t, you can still connect it to a projector via a USB port. To do this, you’ll need an adapter that plugs into your Chromebook’s USB port and then connects to your projector with either a VGA or DVI cable. Depending on how old your projector is, it may not support this type of connection so make sure to check beforehand. Also, keep in mind that using a USB port may limit some of the features available during your presentation or lower the display quality.
Wireless Connection: For those who prefer wireless connections, there are several different ways to do this as well. You’ll need to make sure both devices can be connected wirelessly and if they can’t, it may be possible to purchase an adapter such as Google Chromecast or AppleTV that will allow you to project wirelessly from your Chromebook. Both services offer detailed instructions online so make sure to read them before proceeding. It should also be noted that wireless connections tend to be slower than wired connections so they may not provide the best performance when presenting content from your Chromebook during larger events.
Next we will discuss further about Wireless Connections in detail in the following section…
Wireless Connections
When connecting your Chromebook to a projector, you can use either a wireless or wired connection. Wireless connections provide convenience and allow you to use your Chromebook with the projector from any location nearby. However, there are some downsides to using a wireless connection.
First, it’s important to consider the type of network you’ll be using for your wireless connection. It’s necessary to make sure that your Chromebook is connected to a secure network before attempting a wireless connection with the projector. Additionally, if your router has an outdated security protocol, then your Chromebook may not be able to connect wirelessly.
While wireless connections allow you to move freely in the room while keeping your Chromebook connected to the projector, they also require a considerable amount of battery power. Since most Chromebooks don’t have very large batteries to begin with, it’s wise to bring along an external battery pack when planning on using a wireless connection.
Finally, keep in mind that the audio usually comes disconnected from the video through a wireless connection. As such, it will most likely be necessary for you to plug in speakers separately if you wish to hear sound from the projector as well.
In summary, wireless connectivity is convenient but it does come with quite a few caveats. Moving forward let’s explore another option for connecting your Chromebook—radio frequency (RF).
Radio Frequency
Utilizing radio frequency (RF) technology, Chromebooks are able to easily and wirelessly connect to a projector. This type of connection is advantageous when it comes to the issue of cable clutter and allows for a projector to be placed in any location. It may also offer some users a greater level of control over the projection system by allowing them to walk freely throughout the room rather than requiring them to remain at the projector’s control console.
However, there are certain considerations which should be taken into account before opting for an RF projection system as it requires an ample amount of bandwidth to operate properly. In addition, this type of connection may be more difficult to troubleshoot if there are any technical issues. That said, if a reliable network within your given space can be established then opting for an RF projection system could be a wise choice.
Now that we have discussed radio frequency connections, let’s move onto discussing audio integration in the next section.
Audio Integration
Audio integration is an important final step when connecting your Chromebook to a projector. Depending on the room size, your sound preferences, and other factors, you may need to connect external audio sources such as a microphone or speaker system in order to be heard clearly throughout the room.
External speakers offer clearer sound than in-built laptop speakers, and if placed near the projector, these can provide excellent sound quality during presentations. An external powered speaker system is also ideal for larger rooms, where the sound needs to project further. Microphones are essential if you will be speaking during your presentation. They make it easier for everyone in the room to hear you clearly regardless of their location.
When considering audio integration, debate exists about whether wired or wireless connections offer superior performance from both an audio and cost perspective. Some argue that wired connections are less expensive and easier to set up which equates to better value for money. Conversely, others argue that wireless connections are more efficient and provide better flexibility for users in terms of distance from their source devices. Ultimately this decision should depend on the unique requirements of your presentation space.
Now that audio has been integrated into your projection setup, we can move onto finalizing the connection between your Chromebook and the projector.
Finalizing the Connection
Once you have followed the four easy steps above and connected your Chromebook to a projector, the last step is to finalize the connection. The process for finalizing the connection depends on the type of projector being used.
If you are using an HDMI projector, make sure that the audio and video connections are secure and that all cables are securely connected. Additionally, you can use a display testing tool or switch the resolution setting if experiencing any image quality issues. If you are using a VGA projector, try adjusting the resolution settings on your Chromebook to ensure better image quality.
Another consideration when finalizing your connection is controlling access to your screen. Depending on your hardware setup, you may need to manually make sure that no one will access data from your device without your permission. Doing this will help protect sensitive information that is shared during a presentation.
Finally, once all the necessary preparations have been made, the last step in finalizing your connection is to test it out. From here, take some time to practice navigating through different types of programs and review presentation notes before sharing them with others for best results.
The next step in connecting your Chromebook to a projector is setting wallpaper which can provide additional benefits like creating an aesthetically pleasing display as well as preventing unauthorized individuals from accessing data on your device.
Setting Wallpaper
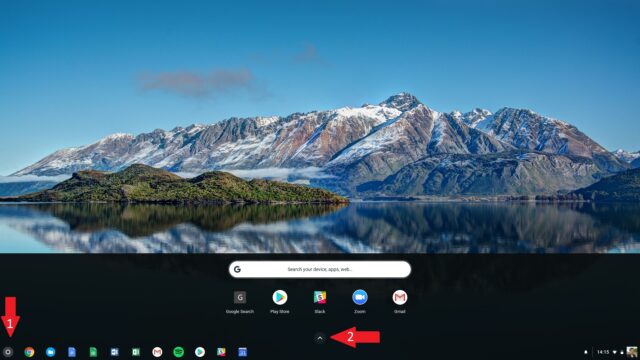
One of the great features of a Chromebook is that you can customize your desktop background with an image or photograph of your choice. To set a new wallpaper on your Chromebook, click the cog wheel icon at the bottom-right corner of the screen. Then, select “Settings” from the list and scroll down to “Appearance.” Here, you can choose to use a default wallpaper offered by Google or upload your own photo by clicking “Choose File” and selecting an acceptable type of file such as a jpg or png. After selecting your photo, save it as your background by pressing “Set Wallpaper.”
There are pros and cons to setting a custom wallpaper. Some users might prefer preset wallpapers because they are clean, simple, and provide a uniform look throughout different Chromebooks regardless of the user’s personalization. On the other hand, setting custom wallpapers allows users to add an element of personality and show off their unique tastes and interests.
No matter what type of wallpaper you choose, it is important to be mindful of file sizes when uploading images so that performance is not affected. Once you have set your preferred wallpaper for your Chromebook, you can move on to adjusting display settings for connecting to a projector.
Adjusting Display Settings
When connecting your Chromebook to a projector, it is important to adjust the display settings accordingly. This can be done in the Chrome OS display settings by right-clicking on the desktop and selecting “Display Settings.” Here you can choose which display to use as your main display, adjust the resolution and scale, text size, brightness, and customize multiple displays. Depending on what type of projector you are using, you may also need to change the orientation of your display if it does not match the projected image.
When deciding which display to use as your main one, most users will want to set their Chromebook as their primary device to ensure that all applications open there first. If you are using an external monitor or projector for presentations or work, however, then it might make more sense to select that as your main display. It all depends on what type of activity you’re doing and how you want the windows and programs organized across both devices.
In regards to resolution and scale, it is typically best for people to set the resolution of their laptop’s display to match the resolution of their projector so that all images appear crisp and clear. Additionally, some users might find that they need to increase or decrease the scaling level until images look correct on both screens.
Depending on personal preference and lighting conditions in the room, it may also be necessary to adjust the brightness level of both your laptop’s screen and your projector. By increasing or decreasing these values as needed, users can ensure that they have comfortable viewing conditions during presentations or work sessions. The same goes for font size; if text looks too small or too large on either screen, simply increment it up or down until the desired effect is achieved.
Finally, depending on how many displays are connected and what kinds of activities are taking place, a user may want to customize each individual display so that windows open where they want them across multiple screens. For instance, presentations could open on the second monitor while other applications such as web browsers are open on the first one. This can help streamline a user’s workflow and make multi-tasking much easier.
By carefully adjusting all of these settings before connecting a Chromebook to a projector, users can ensure that they get a great viewing experience when presenting materials or working remotely.
Frequently Asked Questions and Responses
Are There Any Special Requirements or Settings I Need to Check before Connecting My Chromebook to a Projector?
Yes, there are certain special requirements and settings you will need to check prior to connecting your Chromebook to a projector. Firstly, make sure that the projector is compatible with your Chromebook, as not all projectors work with all types of Chromebooks. Secondly, it is important to check if your Chromebook has the necessary cables needed for connection. If your Chromebook does not have the specific ports needed for connection, then it is important to purchase the necessary cables or adapters. Lastly, ensure that the projector and Chromebook both have sufficient power supply, as this is often required for successful projector-Chromebook connection.
What Type of Cables or Adapters Do I Need to Connect My Chromebook to a Projector?
The type of cable or adapter that you need to connect your Chromebook to a projector will depend on the make and model of both the projector and the Chromebook. Generally speaking, if your projector has a standard VGA input, then you will need a mini-HDMI/VGA adapter in order to connect your Chromebook. If your projector has an HDMI input, then you can use a mini-HDMI cable to connect directly from the Chromebook to the projector. It is important to note that some projectors may require an additional power source for the connection, such as a USB port or AC outlets, so double check before beginning the setup.
How Can I Make Sure My Chromebook and Projector Are Communicating Correctly?
To make sure your Chromebook and projector are communicating correctly, first ensure the Chromebook is in presentation mode. This is most often done by pressing the shortcut key combination “Ctrl + Alt + S” or “Ctrl+ Shift + Search + S” depending on your model. Once you’ve entered presentation mode, check to make sure that the audio and video settings are correct. For example, make sure the audio settings are correct (stereo, mono, etc.) and the video settings match your projector’s native resolution.
Next, connect the Chromebook to your projector using an appropriate connection cable (e.g. VGA, HDMI), depending on the type of port available on both the Chromebook and projector. After connecting the cable, turn on your projector and ensure that it recognizes the display from your Chromebook. If you see a prompt asking for permission to offer access to the projector’s shared device list, click “Allow”.
Finally, double-check your work by testing any media files you may have included in your presentation. Ensure that they appear correctly on the projector’s display and properly play sound through its speakers. This will help you confirm that everything is working as expected and allow you to proceed with confidence during your presentation or class.


